|
The
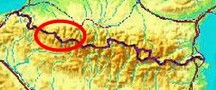
bordermarkers of the Pyrenees : the GRPdesBF
 |
||||||||||||||||||||||||||||||||||||||||||||||||||||||||||||||||||||||||||||
| - stage 13 - Col de la Pierre St-Martin - Sources de Marmitou (bm262-271) |
 |
|||||||||||||||||||||||||||||||||||||||||||||||||||||||||||||||||||||||||||
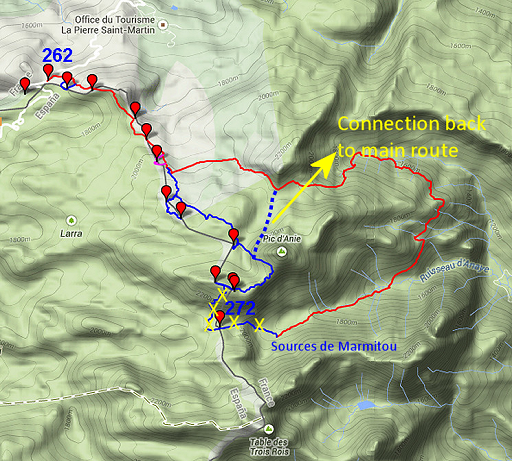 |
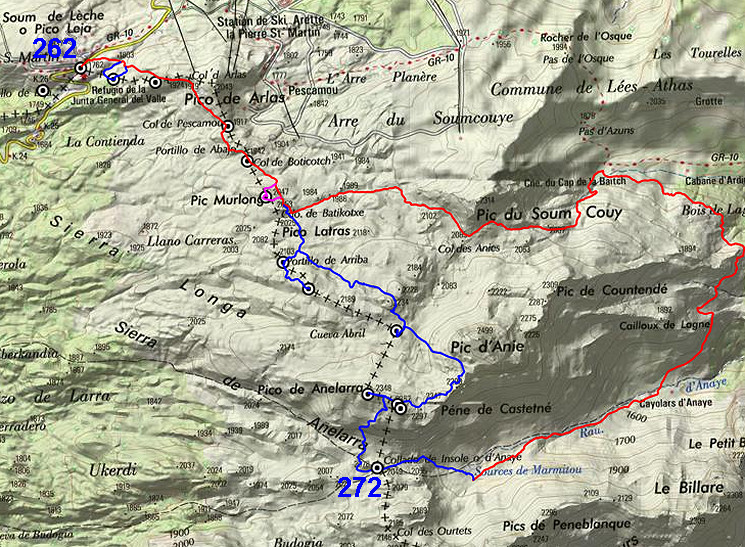
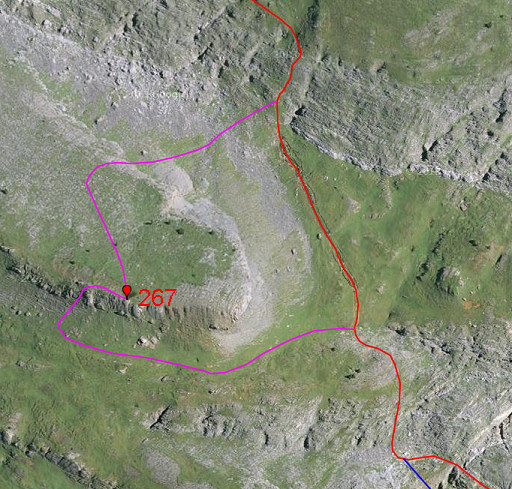
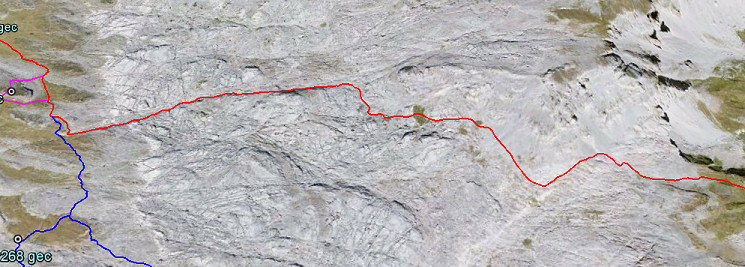
In 2021 I decided to change this stage. See the map to the left. Why? On 12-9-2020 I concluded that the descent from bm271 to 272 was too risky to be included. The blue variant doing bm268-271 will return to the main (red) route. The stage will end at Sources de Marmitou with excellent bivouac-spots. Bm272 will be part of the next stage which will also be changed. |
|||||||||||||||||||||||||||||||||||||||||||||||||||||||||||||||||||||||||||
 |
This is the map of the new stage. The gps-file is grpdesbf-262-271-vs01.kml The maps and directions hereunder have still to be corrected for the new route. |
|||||||||||||||||||||||||||||||||||||||||||||||||||||||||||||||||||||||||||
 |
||||||||||||||||||||||||||||||||||||||||||||||||||||||||||||||||||||||||||||
| Only
the bordermarkers along this stage are shown (and some adjoining ones).
The main route is red,
the variants have other colors. The main route provides a smooth
on-going route along most bordermarkers, the variants give access to
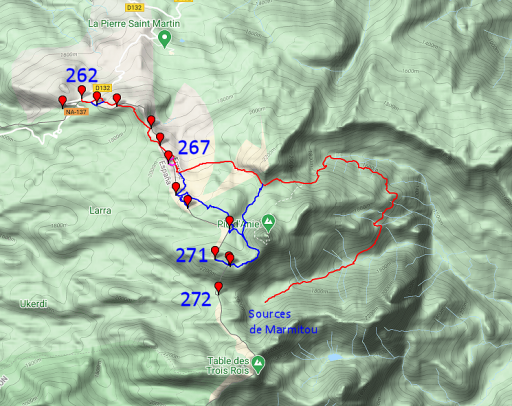
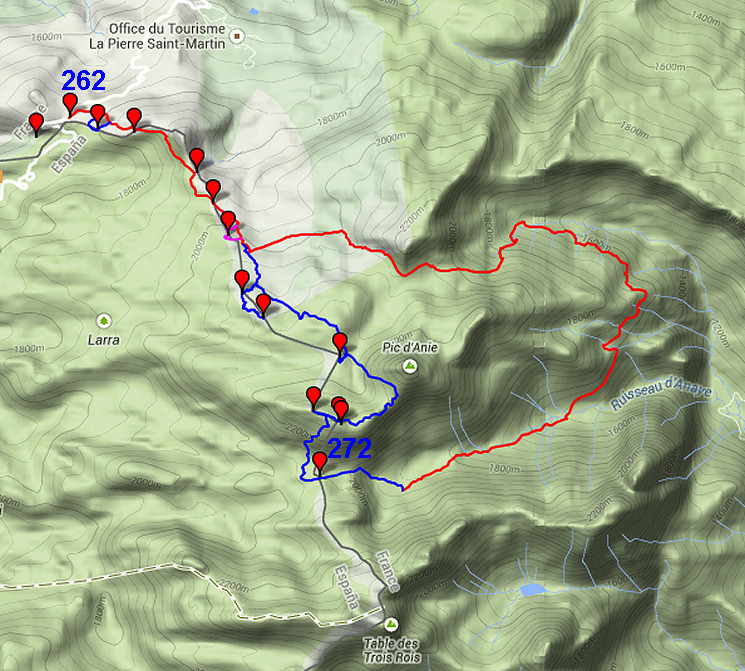
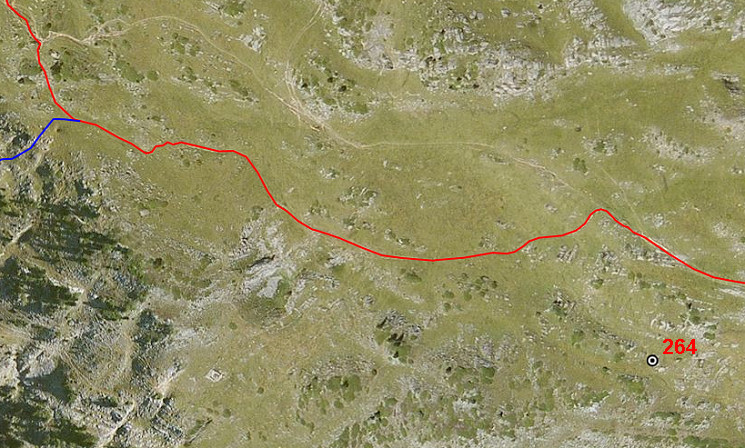
the remaining bordermarkers. See the GRPdesBF-principles. Click here for an fullscreen interactive map. In short The borderline traverses in this stage the barren karst-plateau of Arette-la-Pierre-St-Martin. The main route will cross it on a waymarked trail and then descend via Col des Anies to lower and greener scenery to arrive after a large curve at the Sources de Marmitou. The large variant continues in the karst terrain to cover bm268 to 272 and reaches Sources de Marmitou from another direction. Considerations There are definitely wayfinding issues in this stage although limited for the main route and the first two small variants. The third and large variant however explores the karst terrain in depth with all its crevasses and requires good weather and wayfinding capabilities. The steep descent from bm271 to Col d'Anaye needs caution. Water is scarce on the plateau itself. There's only one source: a small stream/fountain just beyond Col d'Arlas along the trail between bm264 and bm265. On the spanish map it's called "Fuente de la Contienda". At the end of the stage, the Sources de Marmitou make a fine bivouac-spot and there's enough water there. Factsheet
Gps-files needed
You might check the relevant webpages in the 'All markers'-section. They provide more pictures of the bordermarkers and additional information on them. Version 03 December 2014. If you have any correction, suggestion etcetera -> please email me: eefberns@grenspalen.nl MAPS AND DIRECTIONS You might check the relevant webpages in the 'All markers'-section and 'All my trips'-section for more pictures of the bordermarkers and wayfinding-issues. Print your own maps It's easy to print your own - custom made - maps with the GRPdesBF-route and the bordermarkers on them. See: Print your own maps |
||||||||||||||||||||||||||||||||||||||||||||||||||||||||||||||||||||||||||||
  |
||||||||||||||||||||||||||||||||||||||||||||||||||||||||||||||||||||||||||||
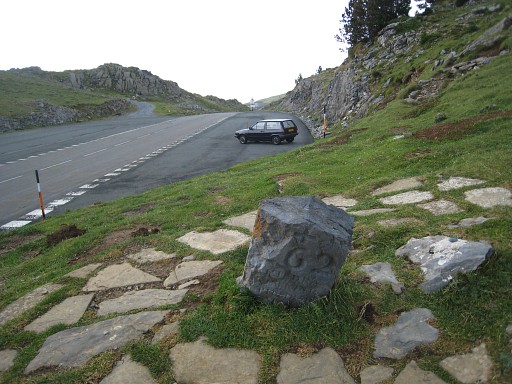 |
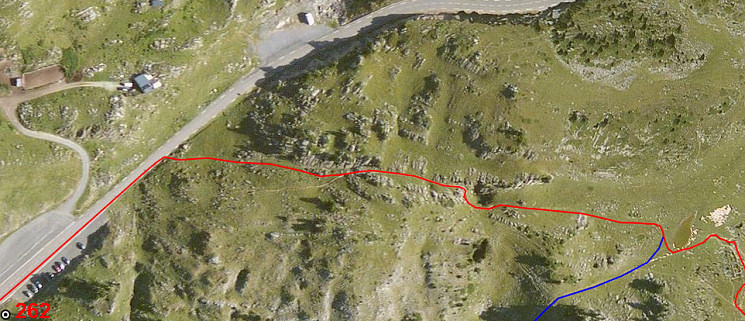
Bm262, the starting point of the stage. From bm262, go to the NE-end of the parking strip. |
|||||||||||||||||||||||||||||||||||||||||||||||||||||||||||||||||||||||||||
 |
||||||||||||||||||||||||||||||||||||||||||||||||||||||||||||||||||||||||||||
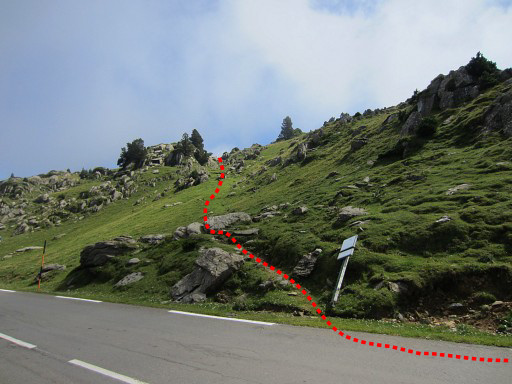 |
Then after 50m, a yellow waymarked trail starts going E. | |||||||||||||||||||||||||||||||||||||||||||||||||||||||||||||||||||||||||||
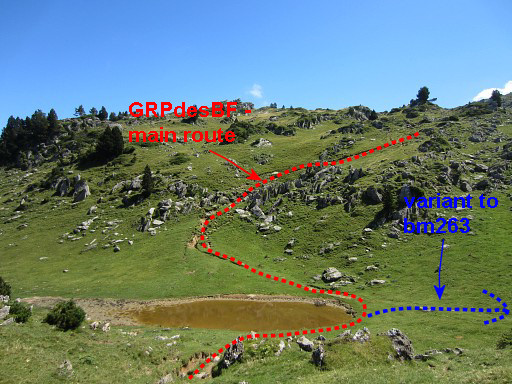 |
Soon (after 300m) the trail arrives at this
small oval lake. On the opposite side the trail (= main route) climbs uphill on a distinctive worn-out path. But for the first variant (to bm263) go right (=SW) and climb to a ridge/col |
|||||||||||||||||||||||||||||||||||||||||||||||||||||||||||||||||||||||||||
| Variant 1 via bm263 |
||||||||||||||||||||||||||||||||||||||||||||||||||||||||||||||||||||||||||||
 |
A short detour (0,5km) to cover bm263 |
|||||||||||||||||||||||||||||||||||||||||||||||||||||||||||||||||||||||||||
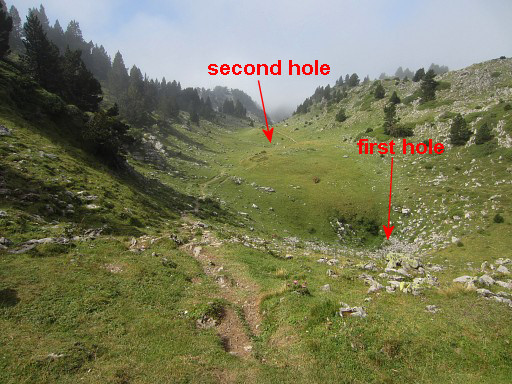 |
As said, first you have to climb to a little col. From the col, you will see a hole/pit before you and 70m further a second hole/pit but smaller. |
|||||||||||||||||||||||||||||||||||||||||||||||||||||||||||||||||||||||||||
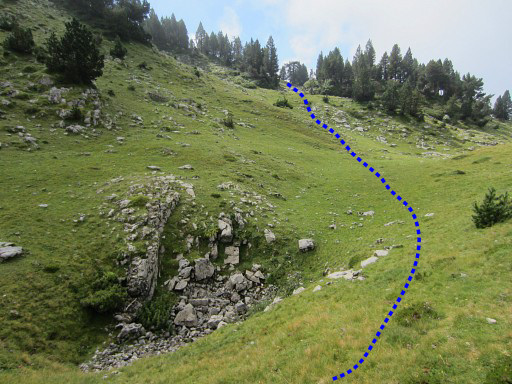 |
Having arrived at that second hole, go left and climb S/SE between two ridges with pine-trees. When you arrive at the 'top' of that climb - which is sort of rim with a steep descent on the other side - bend to the left |
|||||||||||||||||||||||||||||||||||||||||||||||||||||||||||||||||||||||||||
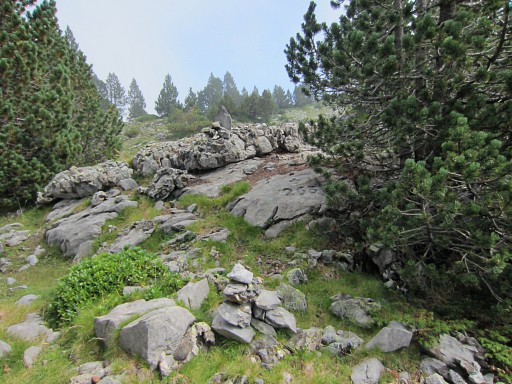 |
and search for bm263 which is a bit hidden
under a tree. Then find your way back to the main route by traversing NE through the terrain until |
|||||||||||||||||||||||||||||||||||||||||||||||||||||||||||||||||||||||||||
| End of variant 1 |
||||||||||||||||||||||||||||||||||||||||||||||||||||||||||||||||||||||||||||
 |
||||||||||||||||||||||||||||||||||||||||||||||||||||||||||||||||||||||||||||
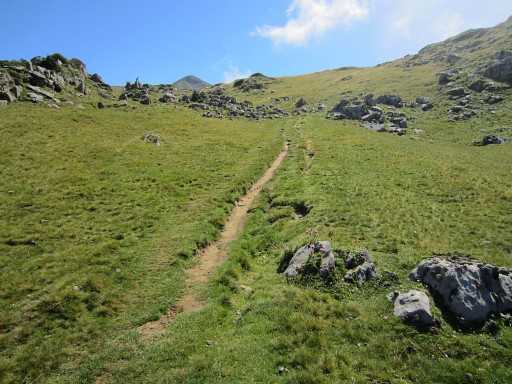 |
you reach a
distinctive worn-out trail going SEE. You are back at the main route of the GRPdesBF. In the distance, the Pic d'Arlas becomes visible and will become |
|||||||||||||||||||||||||||||||||||||||||||||||||||||||||||||||||||||||||||
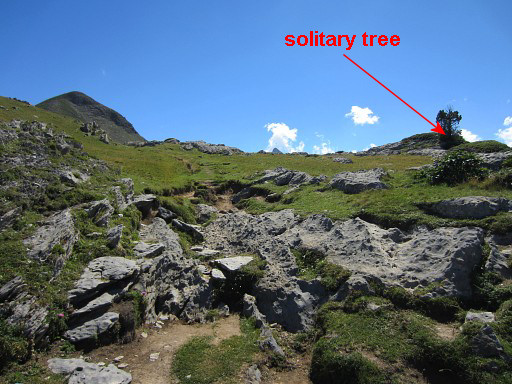 |
more visible as you proceed. Note the solitary tree to the right, that is an important landmark to find bm264. In fact: bm264 is 30m SSW of that tree. |
|||||||||||||||||||||||||||||||||||||||||||||||||||||||||||||||||||||||||||
 |
So: when you arrive at this point, leave the trail and go to the tree. Then go 30m SSW and you are at the rock of bm264. This picture: from the solitary tree, looking towards bm264. |
|||||||||||||||||||||||||||||||||||||||||||||||||||||||||||||||||||||||||||
 |
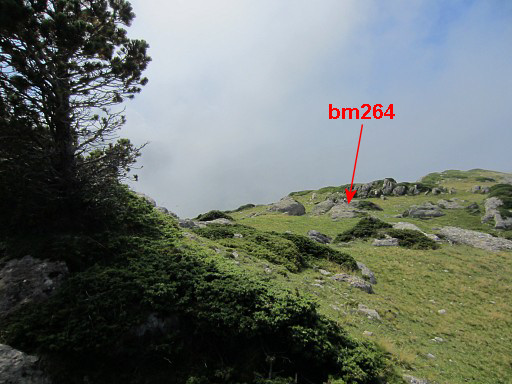
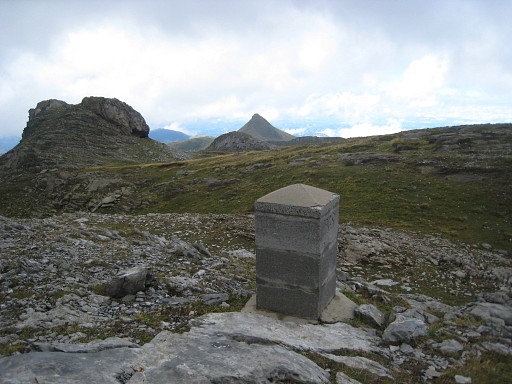
Bm264, with Pic d'Arlas and Pic d'Anie (to the right). | |||||||||||||||||||||||||||||||||||||||||||||||||||||||||||||||||||||||||||
 |
||||||||||||||||||||||||||||||||||||||||||||||||||||||||||||||||||||||||||||
 |
Back to the trail and continuing to Col d'Arlas and the source at the hillside of Pic d'Arlas. |
|||||||||||||||||||||||||||||||||||||||||||||||||||||||||||||||||||||||||||
 |
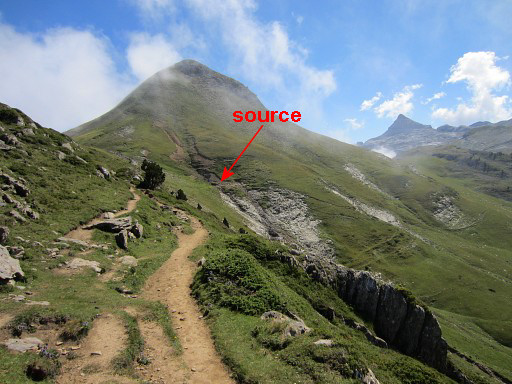
After passing Col d'Arlas and curving underneath Pic d'Arlas, you will pass this source Remember: this is the only source on the vast karst plateau laying ahead. |
|||||||||||||||||||||||||||||||||||||||||||||||||||||||||||||||||||||||||||
 |
Continue to bm265 at Col de Pescamou |
|||||||||||||||||||||||||||||||||||||||||||||||||||||||||||||||||||||||||||
 |
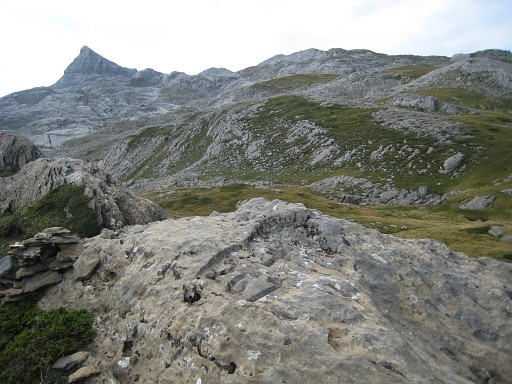
Further on, looking
ahead in southern direction to the distinctive hill-ridge of Murlong where bm267 is. |
|||||||||||||||||||||||||||||||||||||||||||||||||||||||||||||||||||||||||||
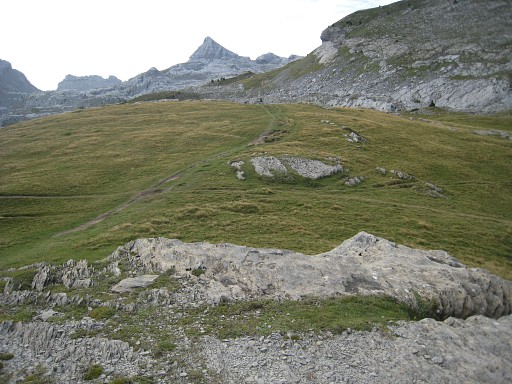 |
But first bm266 at Col de Boticotch |
|||||||||||||||||||||||||||||||||||||||||||||||||||||||||||||||||||||||||||
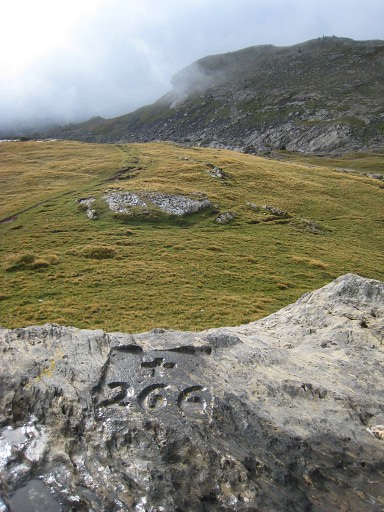 |
Bm266 |
|||||||||||||||||||||||||||||||||||||||||||||||||||||||||||||||||||||||||||
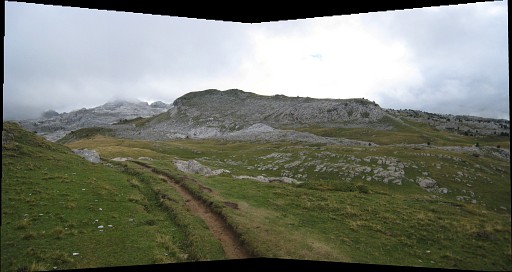
 |
The route ahead with its various variants. |
|||||||||||||||||||||||||||||||||||||||||||||||||||||||||||||||||||||||||||
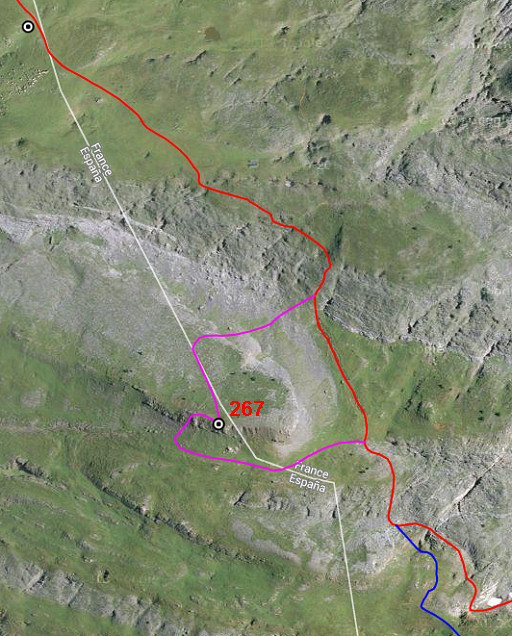
| Variant 2 via bm267 |
||||||||||||||||||||||||||||||||||||||||||||||||||||||||||||||||||||||||||||
 |
As you can see: you need to climb the hillridge |
|||||||||||||||||||||||||||||||||||||||||||||||||||||||||||||||||||||||||||
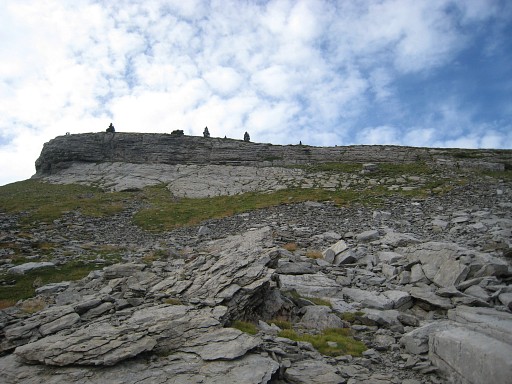 |
This picture: the upper hillridge of Murlong in front. Climbing to the ridge is easier than it looks. |
|||||||||||||||||||||||||||||||||||||||||||||||||||||||||||||||||||||||||||
 |
Bm267 is at the S-side of the ridge. Then descending at the other side and picking up the main route again |
|||||||||||||||||||||||||||||||||||||||||||||||||||||||||||||||||||||||||||
| End of variant 2 |
||||||||||||||||||||||||||||||||||||||||||||||||||||||||||||||||||||||||||||
 |
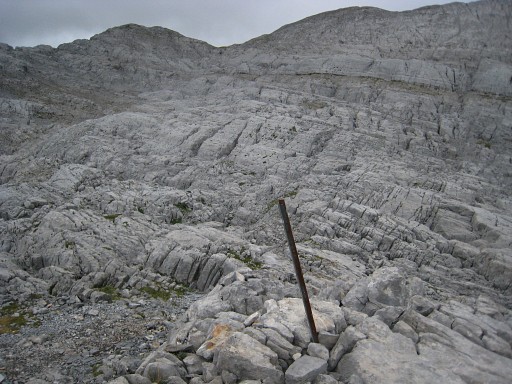
Then, after ± 100m, there’s a metal
pole which was once a waysign. The yellow trail (= the main route) bends at this point to the left and descends in the crevasses in the direction of Pic d'Anie. Straight on there's a orange/red trail (= variant 3) which is in fact an alternative route to Pic d'Anie. |
|||||||||||||||||||||||||||||||||||||||||||||||||||||||||||||||||||||||||||
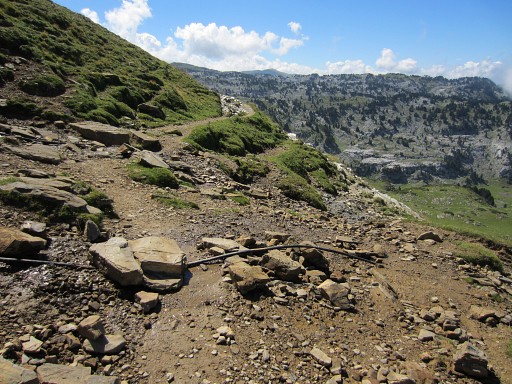
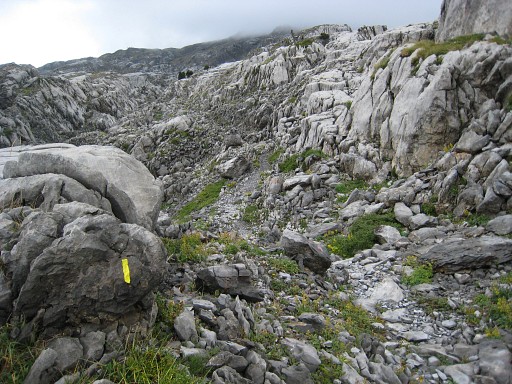
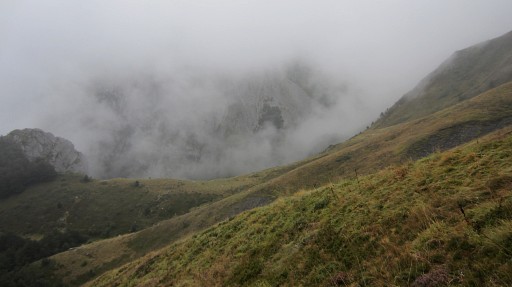
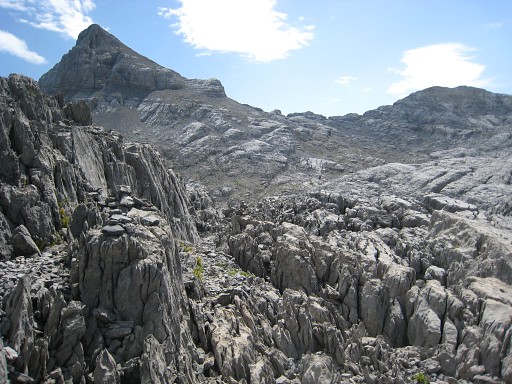
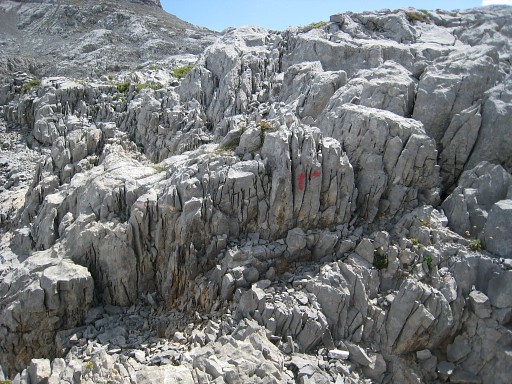
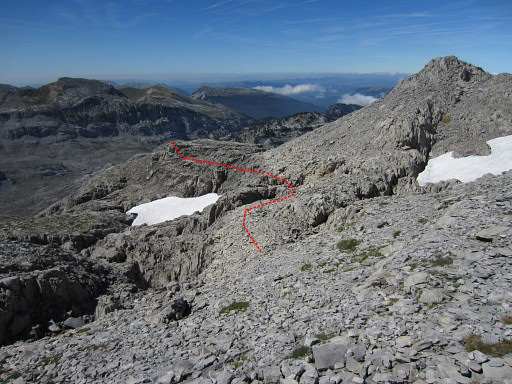
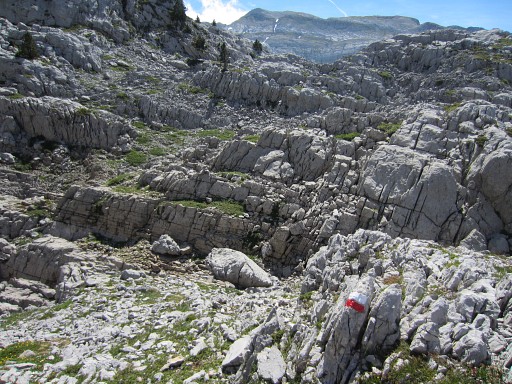
 The first part of the main route, traversing through the karst-crevasses. |
||||||||||||||||||||||||||||||||||||||||||||||||||||||||||||||||||||||||||||
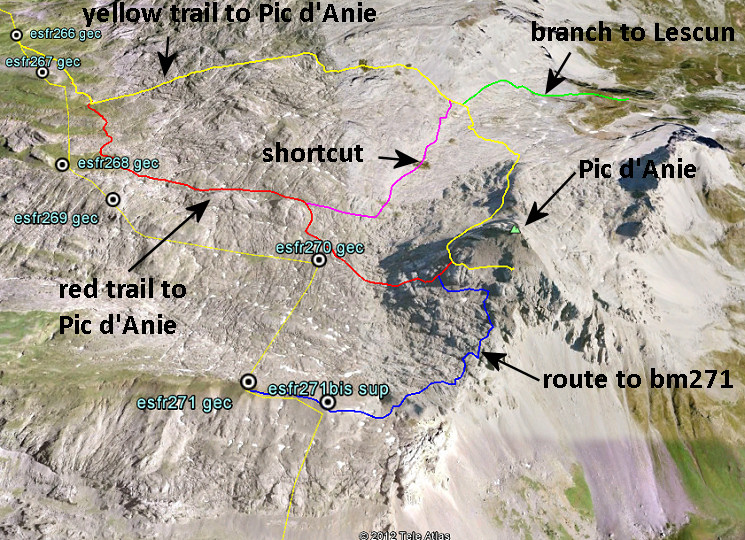 This is my own map (with different colors) - after a few years of exploring this karst-plateau - of the various trail on the karst plateau. The yellow + green trail = the main route. The red + blue trail =variant 3 until bm271. Keep in mind that the cairn-waymarked trails can change a bit from year to year. Check these routes in detail on Google Earth with this kml |
||||||||||||||||||||||||||||||||||||||||||||||||||||||||||||||||||||||||||||
 Another map. |
||||||||||||||||||||||||||||||||||||||||||||||||||||||||||||||||||||||||||||
 |
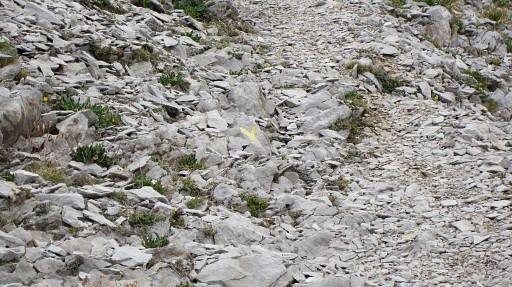
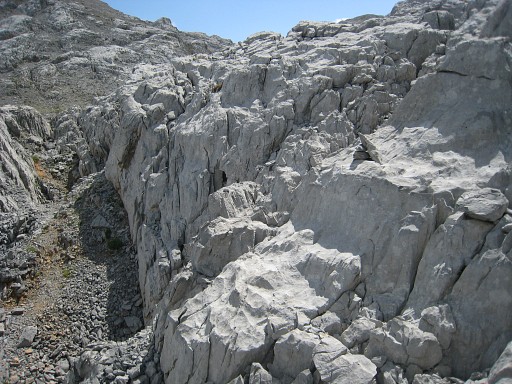
The
yellow trail descends into the karst-crevasses, |
|||||||||||||||||||||||||||||||||||||||||||||||||||||||||||||||||||||||||||
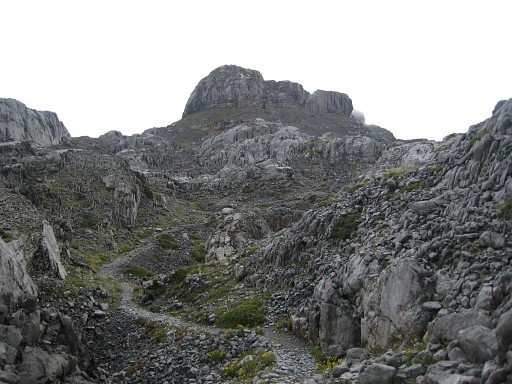 |
heading to Pic du Soum Couy | |||||||||||||||||||||||||||||||||||||||||||||||||||||||||||||||||||||||||||
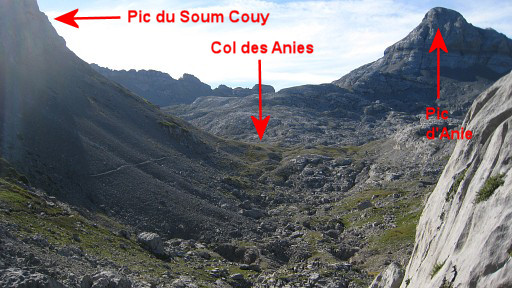 |
Having left the crevasses and looking ahead
to the trail at the slope of Pic du Soum Couy I keep following that trail untill approximately the ridge of the hill which is approximately the Col des Anies. |
|||||||||||||||||||||||||||||||||||||||||||||||||||||||||||||||||||||||||||
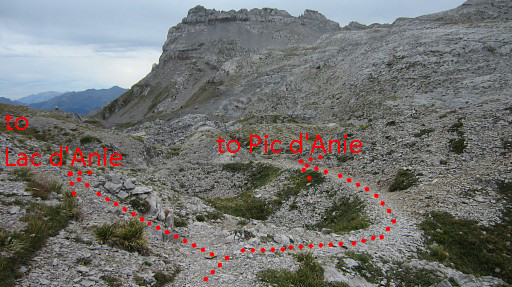 |
You have to be attentive at this point. You need to go left here on |
|||||||||||||||||||||||||||||||||||||||||||||||||||||||||||||||||||||||||||
 |
a branch leading to Lac d’Anie.It's ‘blocked’ with a yellow cross. The trail brings you along the dry pond of Lac d'Anie to the ridge of the plateau. Then descend to Cabane de la Baigt. |
|||||||||||||||||||||||||||||||||||||||||||||||||||||||||||||||||||||||||||
 |
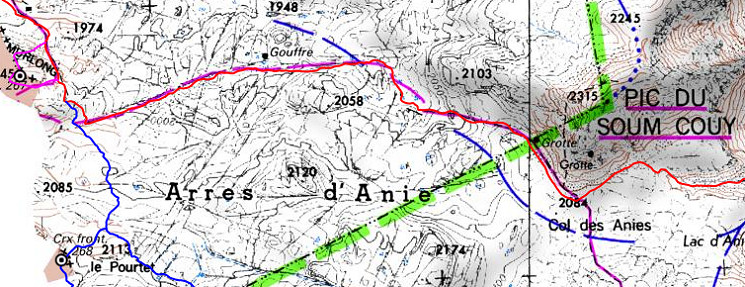
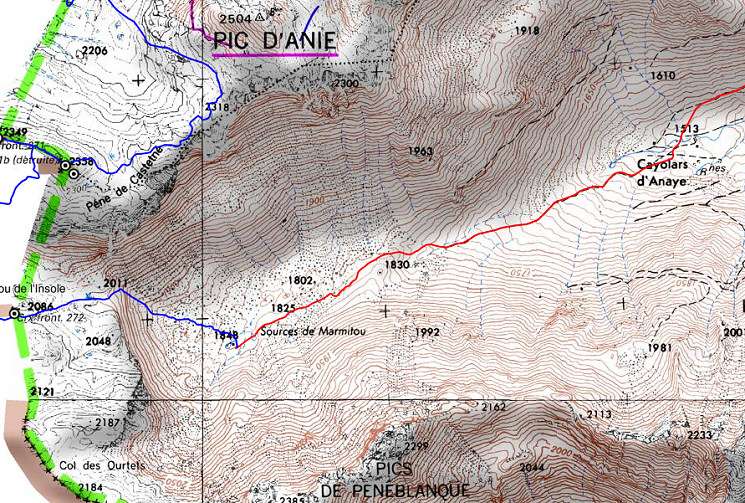
Let's show this part on the IGNfr-map. |
|||||||||||||||||||||||||||||||||||||||||||||||||||||||||||||||||||||||||||
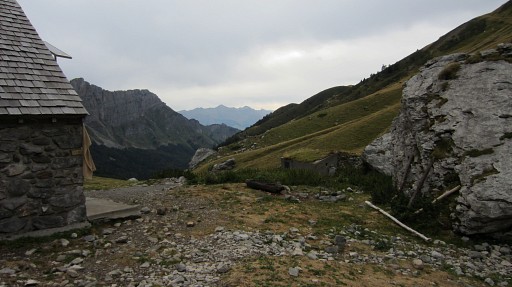 |
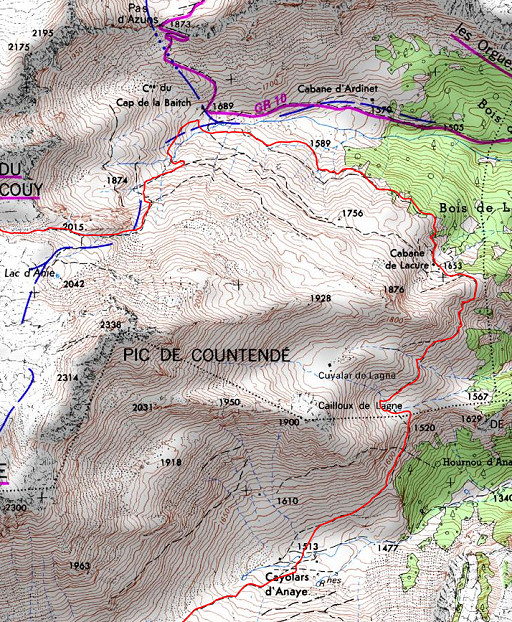
This picture: having arrived at Cabane de la Baigt. From Cabane de la Baigt: head for a passing |
|||||||||||||||||||||||||||||||||||||||||||||||||||||||||||||||||||||||||||
 |
through two rocks, then further towards the maze of trails along an exposed hill and then entering the forest. |
|||||||||||||||||||||||||||||||||||||||||||||||||||||||||||||||||||||||||||
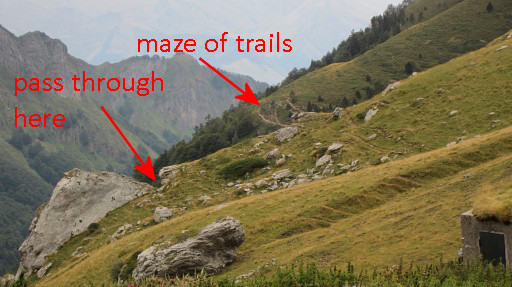
 |
You will arrive at the Cabane de Lacure (open for hikers) with his mongolian yurt-tent. Now: - head SE to the trail just above the forest-edge - follow that one until you arrive at |
|||||||||||||||||||||||||||||||||||||||||||||||||||||||||||||||||||||||||||
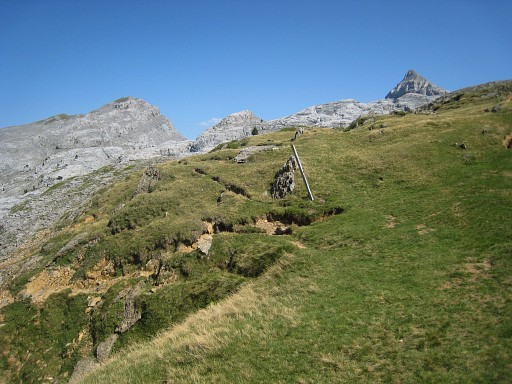
 |
a grassy saddle or pass with Pic de la Brecque at your left The trail gets vague here but after the saddle/pass (stay above the flat saddle itself), the trail reappears and descends SW . |
|||||||||||||||||||||||||||||||||||||||||||||||||||||||||||||||||||||||||||
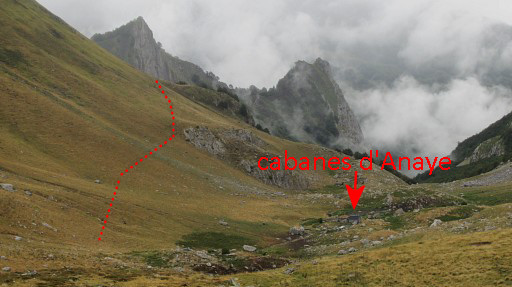 |
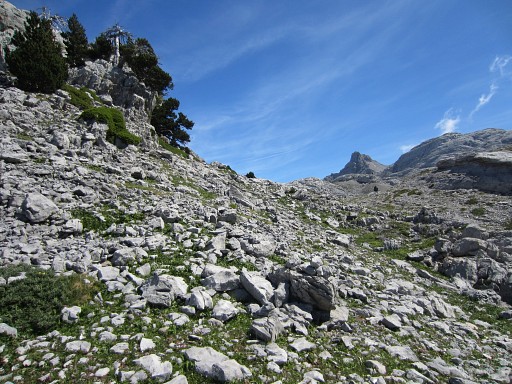
to the cabanes d’Anaye. This is a view back. |
|||||||||||||||||||||||||||||||||||||||||||||||||||||||||||||||||||||||||||
 The last part of the main route. |
||||||||||||||||||||||||||||||||||||||||||||||||||||||||||||||||||||||||||||
 |
Then climbing SWW towards the upper valley | |||||||||||||||||||||||||||||||||||||||||||||||||||||||||||||||||||||||||||
 |
when the two cols become visible and |
|||||||||||||||||||||||||||||||||||||||||||||||||||||||||||||||||||||||||||
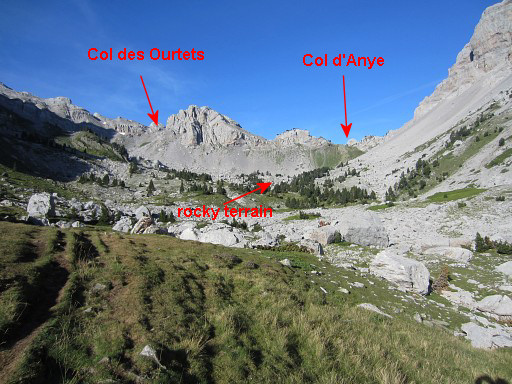
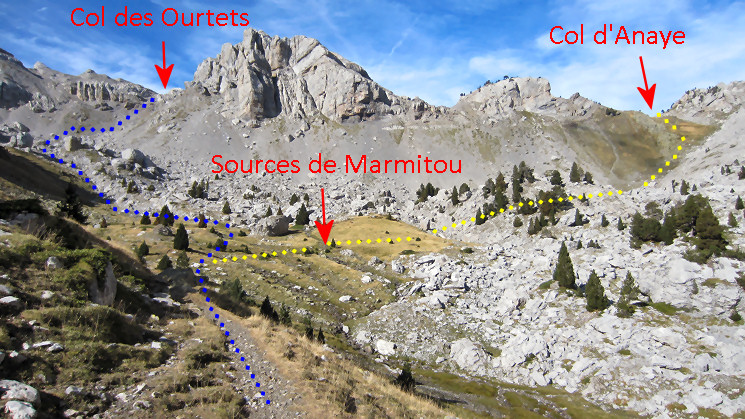 you arrive at Sources de Marmitou, the end of this stage. Variant 3 (the yellow line) comes from Col d'Anaye and the next stage will climb to Col des Ourtets. |
||||||||||||||||||||||||||||||||||||||||||||||||||||||||||||||||||||||||||||
| Variant 3 via bm268-272 |
||||||||||||||||||||||||||||||||||||||||||||||||||||||||||||||||||||||||||||
 |
The first part of variant 3. As you can see a very rocky terrain. |
|||||||||||||||||||||||||||||||||||||||||||||||||||||||||||||||||||||||||||
|
The start of the variant. This metal pole was
once a waysign. To the left descends the main route along a yellow trail into the crevasses. Straight forward, variant 3 follows a red/orange trail |
|||||||||||||||||||||||||||||||||||||||||||||||||||||||||||||||||||||||||||
 |
Further on
(± 600m from bm267) - on this distinct spot with two cairns - the trail passes between them. Here, leave the trail and go SW |
|||||||||||||||||||||||||||||||||||||||||||||||||||||||||||||||||||||||||||
 |
for ± 150m to bm268, don't miss the original bordercross besides it. |
|||||||||||||||||||||||||||||||||||||||||||||||||||||||||||||||||||||||||||
 |
Bm268 with a view to the hillridge of Murlong (bm267) and Pic d'Arlas. |
|||||||||||||||||||||||||||||||||||||||||||||||||||||||||||||||||||||||||||
 |
From bm268 it's about 350m to the SE to bm269. There are cairns
helping. Also here, there's the original cross besides the borderpillar. |
|||||||||||||||||||||||||||||||||||||||||||||||||||||||||||||||||||||||||||
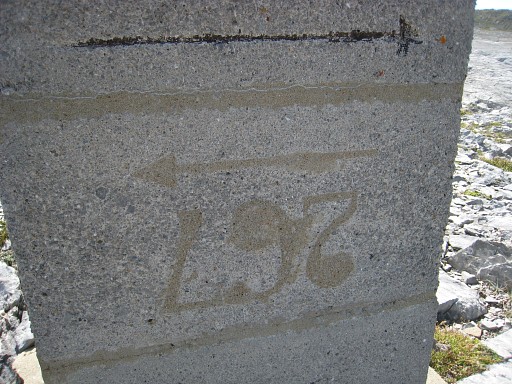 |
Close-up. Apparently the original plan was to build a complementary pillar at bm267 as well. In the concrete base of the bm there's a date engraved: 1983 Now return - via bm268 - to the red/orange trail and continue SE |
|||||||||||||||||||||||||||||||||||||||||||||||||||||||||||||||||||||||||||
 After ± 1,5km you will arive at a spot with this panorama. To the left: Pic d'Anie |
||||||||||||||||||||||||||||||||||||||||||||||||||||||||||||||||||||||||||||
 |
There might be still a metal pole at this spot. | |||||||||||||||||||||||||||||||||||||||||||||||||||||||||||||||||||||||||||
 |
From
this spot the red trail dives into the crevasses towards Pic d’Anie. |
|||||||||||||||||||||||||||||||||||||||||||||||||||||||||||||||||||||||||||
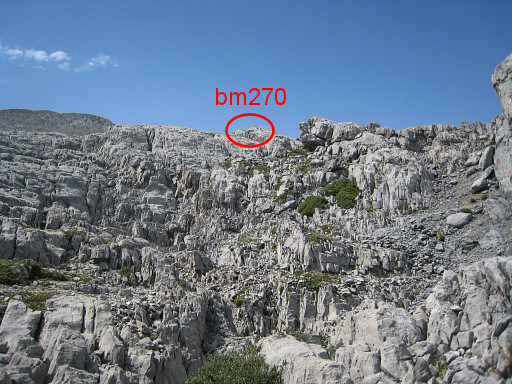
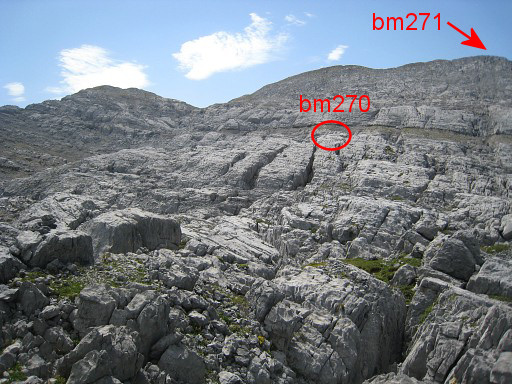 |
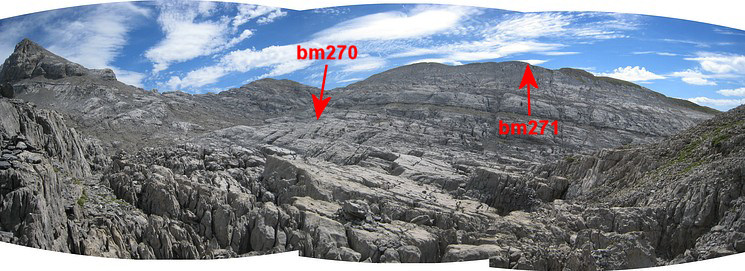
Bm270 is visible from this point thanks to a cairn. |
|||||||||||||||||||||||||||||||||||||||||||||||||||||||||||||||||||||||||||
 |
Zoom-in |
|||||||||||||||||||||||||||||||||||||||||||||||||||||||||||||||||||||||||||
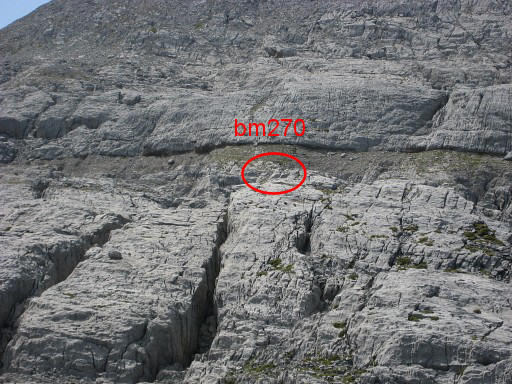
 |
Actually the red trail passes a bit too far from bm270 but an older course of the red trail came closer. Luckily there's still an old (faded) red arrow pointing to the old trail. It brings you through a sort corridor to a parallel path, ±15m further. |
|||||||||||||||||||||||||||||||||||||||||||||||||||||||||||||||||||||||||||
 |
This picture: at that parallel path where you can start your climb to bm270 There were already a few cairns and I added some more. |
|||||||||||||||||||||||||||||||||||||||||||||||||||||||||||||||||||||||||||
 |
You can already see the cairn, marking bm270. | |||||||||||||||||||||||||||||||||||||||||||||||||||||||||||||||||||||||||||
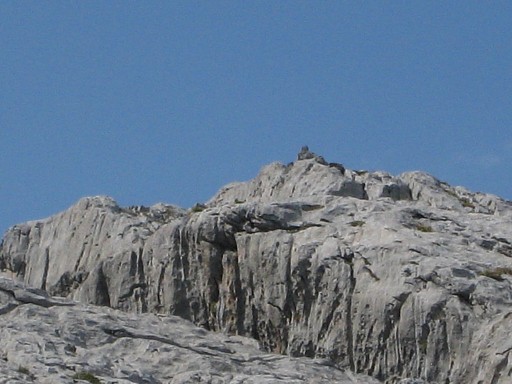 |
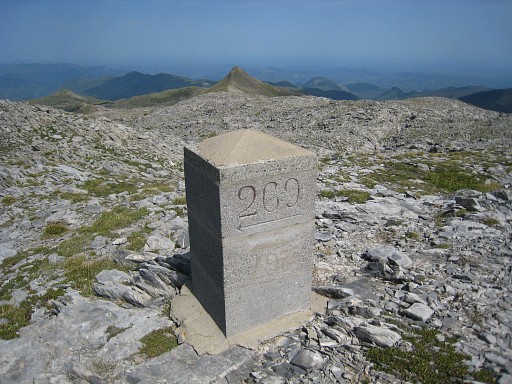
Climb towards bm270, not straight but with a bow. En route: this zoom-in picture of bm270. |
|||||||||||||||||||||||||||||||||||||||||||||||||||||||||||||||||||||||||||
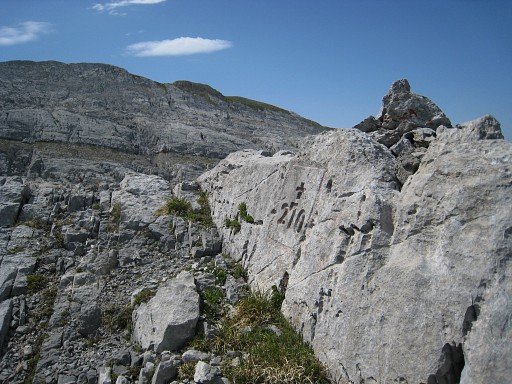 |
Bm270 |
|||||||||||||||||||||||||||||||||||||||||||||||||||||||||||||||||||||||||||
 |
From bm270, return to the red waymarked trail and continue SE. The red trail will eventually climb the Pic d'Anie but we have to leave it to bend SE-SW-W towards bm271. |
|||||||||||||||||||||||||||||||||||||||||||||||||||||||||||||||||||||||||||
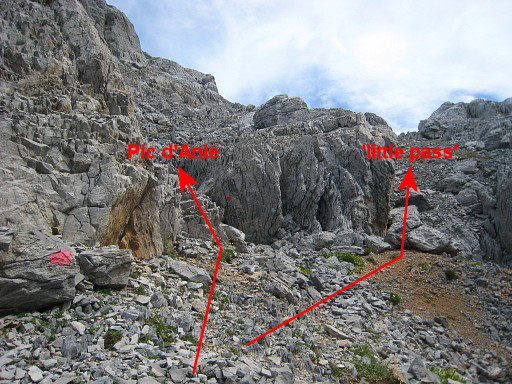 |
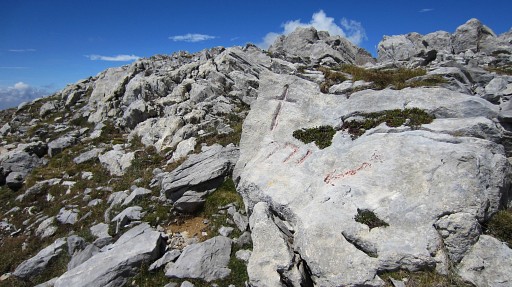
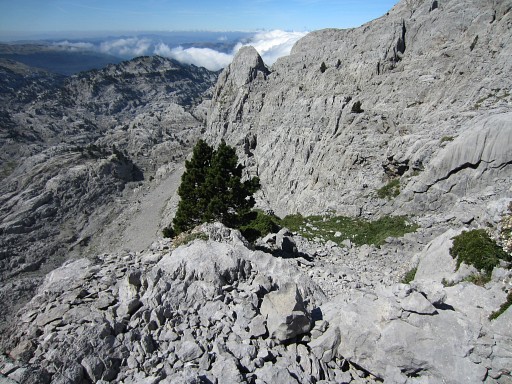
So: return to the red trail and continue towards Pic d’Anie. The red trail traverses the crevasses and starts to climb along the slope of Pic d’Anie. Then it climbs steeply through a sort of ‚chimney’. Shortly after that chimney, the red trail bends to the left (this picture). At that point, go straight ahead to what seems a little pass. |
|||||||||||||||||||||||||||||||||||||||||||||||||||||||||||||||||||||||||||
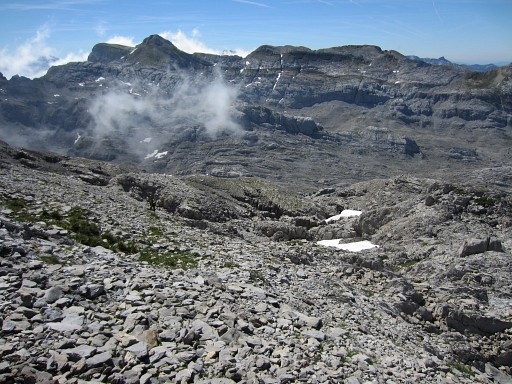
 This panorama: taken before arriving at the 'little pass' |
||||||||||||||||||||||||||||||||||||||||||||||||||||||||||||||||||||||||||||
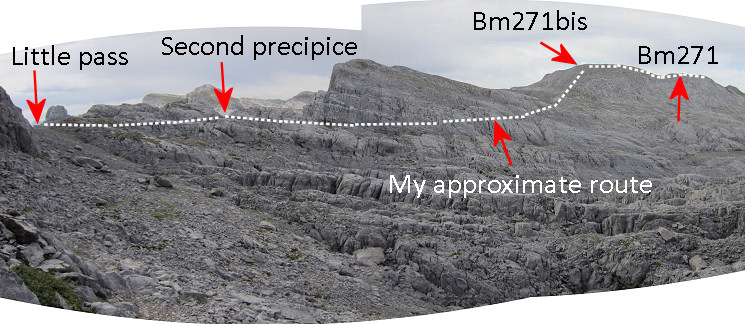 Another panorama with the approximate route to follow. |
||||||||||||||||||||||||||||||||||||||||||||||||||||||||||||||||||||||||||||
 |
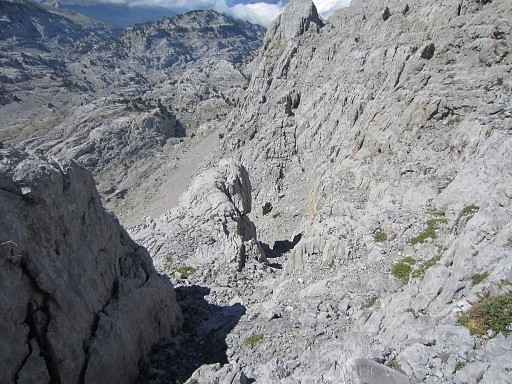
The goal is clear: the ridge between Pic d’Anie and the ridge of bm271. It looks like a pass but on the other side is a scary precipice. In 2011 I called it the "little pass". |
|||||||||||||||||||||||||||||||||||||||||||||||||||||||||||||||||||||||||||
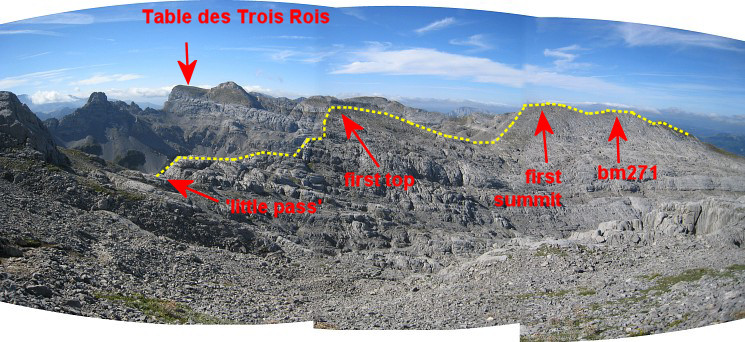
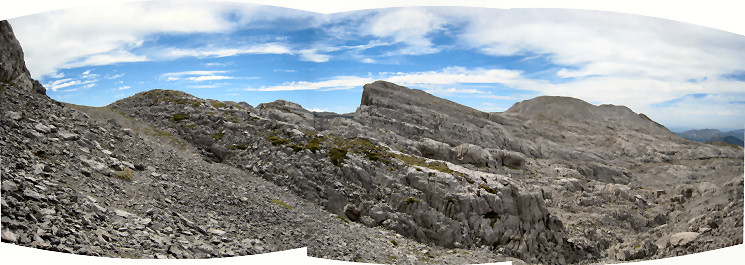 this view of the 'little pass', first top and the two-headed ridge far away |
||||||||||||||||||||||||||||||||||||||||||||||||||||||||||||||||||||||||||||
 |
As said, the "little pass" is at the edge of a precipice. | |||||||||||||||||||||||||||||||||||||||||||||||||||||||||||||||||||||||||||
 |
Then traversing SW along cairns to the edge of a second precipice, now with a giant pillar in the middle. | |||||||||||||||||||||||||||||||||||||||||||||||||||||||||||||||||||||||||||
 |
Before you get to the ridge with the two summits, you need to traverse
underneath the "first top". A few cairns help you but it isn’t easy. This picture: having passed the 'first top' and started climbing the rest of the crête and now looking back at that first top and Pic d'Anie. |
|||||||||||||||||||||||||||||||||||||||||||||||||||||||||||||||||||||||||||
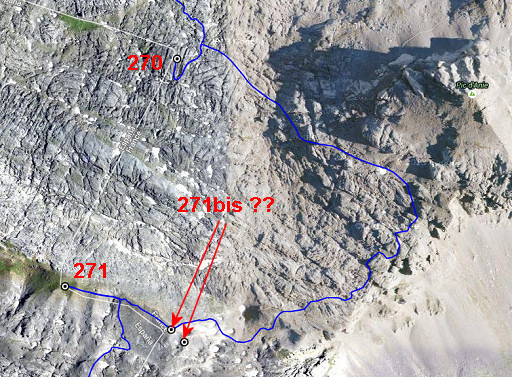
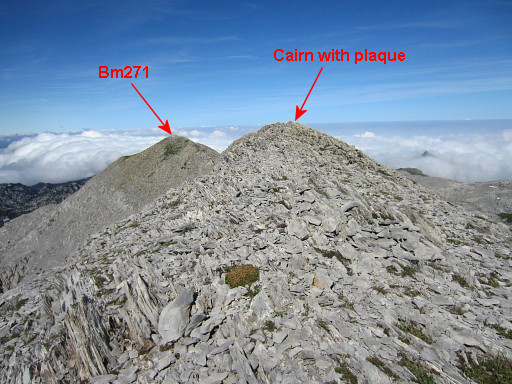 |
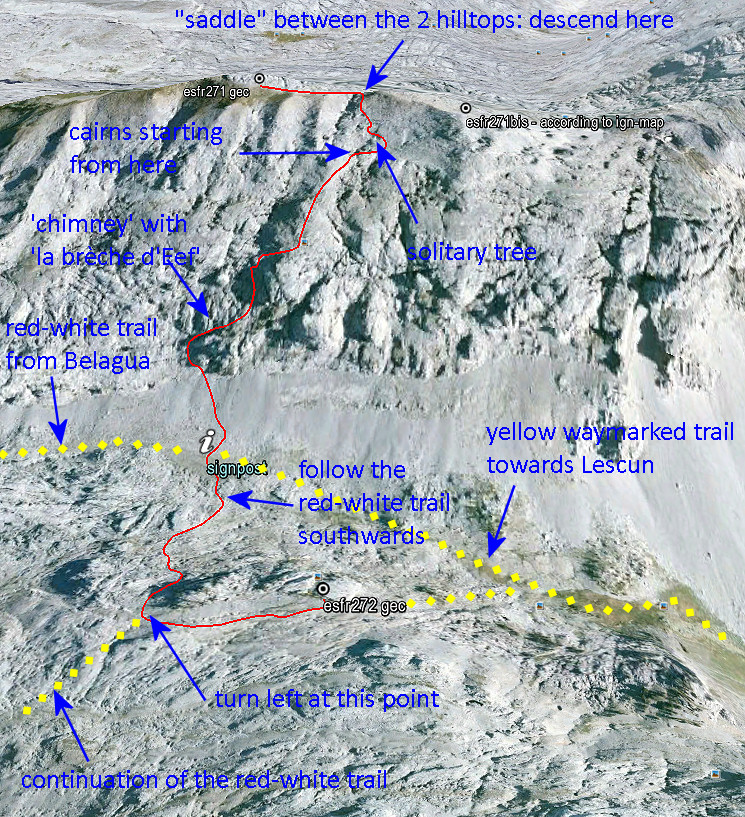
This picture: having reached the ridge at its eastern end and looking to
the NWW. This is approximately the spot where bm271bis should
have been according to the French IGN-maps. But that map says:
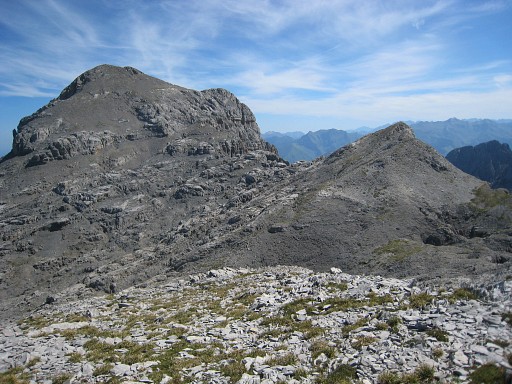
"détruite" (=ruined) You can see two hilltops ahead. The first is where a large cairn is built with an iron plaque besides it. The second one is where bm271 is. |
|||||||||||||||||||||||||||||||||||||||||||||||||||||||||||||||||||||||||||
 |
This is the approximate place of bm271bis, according to the French topographical map (my
walking stick). It is ± 75 meter SE of the 'first summit'. But there's no trace of a bordercross here. See 20130901 for an analysis to to establish the original location of bm271bis. |
|||||||||||||||||||||||||||||||||||||||||||||||||||||||||||||||||||||||||||
 |
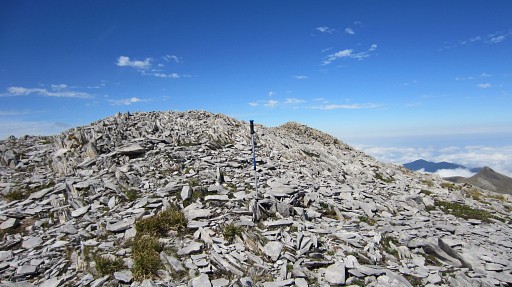
Climbing to the 'rest of the crête' is easy on this sort of terrain. A bit further is a large cairn. From that first cairn looking NWW to the next summit with the next cairn. As said before, it’s more or less the highest point of this first‘head’. |
|||||||||||||||||||||||||||||||||||||||||||||||||||||||||||||||||||||||||||
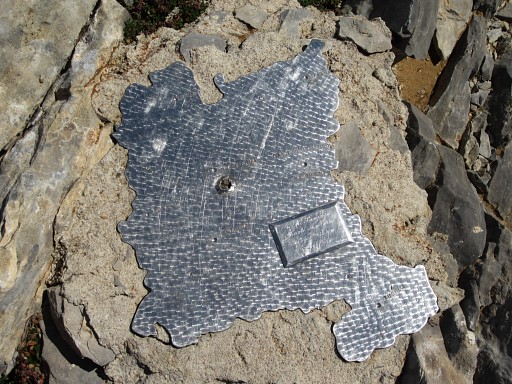
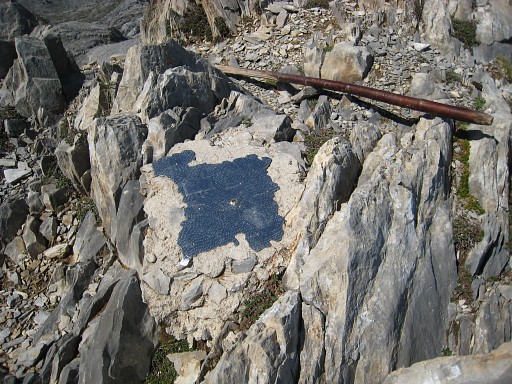 |
Besides it, there's an iron plate with
the map-contour of Navarra. and this inscription: G(?). M.Languesa Monte Añelarra Altitud 2345 m 28-6-1981 Pelegrin |
|||||||||||||||||||||||||||||||||||||||||||||||||||||||||||||||||||||||||||
 |
Main question: has this any significance in determining the original spot of bm271bis? Answer: NO. There's no indication that this is an official geodetic marker, let alone that an official state institution was responsible. The inscription only says that this is the (summit) of Monte Añelarra and it's indeed the highest point of the Añelarra-ridge (according to the French and Spanish topographical maps) |
|||||||||||||||||||||||||||||||||||||||||||||||||||||||||||||||||||||||||||
 |
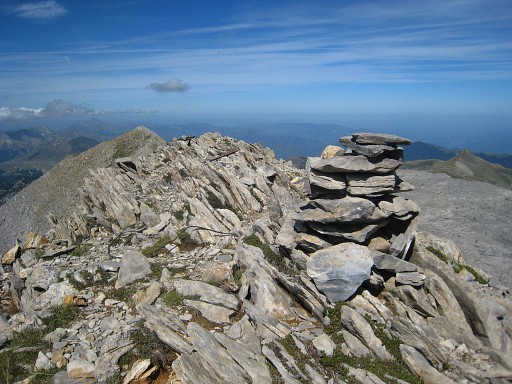
Then further along the ridge and via a sort of pass to the second summit with this cairn and bm271 nearby |
|||||||||||||||||||||||||||||||||||||||||||||||||||||||||||||||||||||||||||
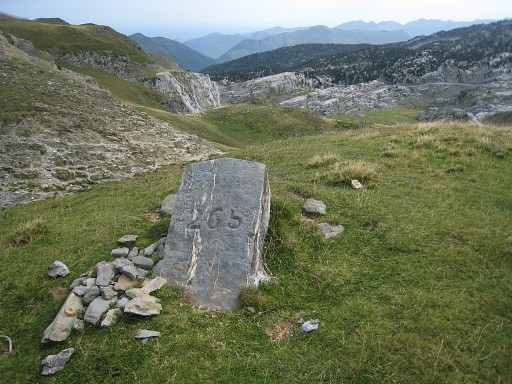
 |
Bm271 is easy to find underneath the second cairn, at the southern slope of the ridge. | |||||||||||||||||||||||||||||||||||||||||||||||||||||||||||||||||||||||||||
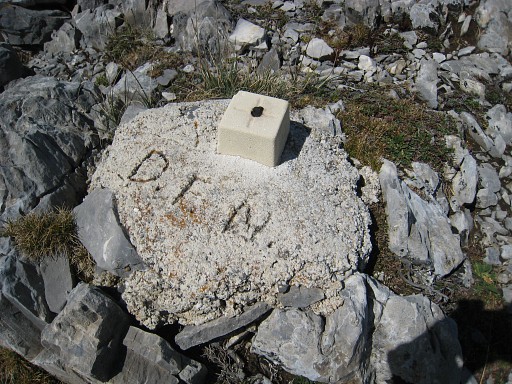 |
A bit further on the ridge, this geodetic marker D.F.N. is the abbreviation of Diputación Foral de Navarra, let's say the government of Navarra. So: they consider (I suppose) this very spot to be the exact place where the straight borderline coming from bm270 nods off 90 degrees and follows the ridge NNE to (the destroyed) bm271. |
|||||||||||||||||||||||||||||||||||||||||||||||||||||||||||||||||||||||||||
 |
Looking back: Pic d'Anie, 'little pass', first top and first summit are well visible. Now return to the 'pass' between second and first summit. That is where you have to descend to the S. Let show it all on a map: |
|||||||||||||||||||||||||||||||||||||||||||||||||||||||||||||||||||||||||||
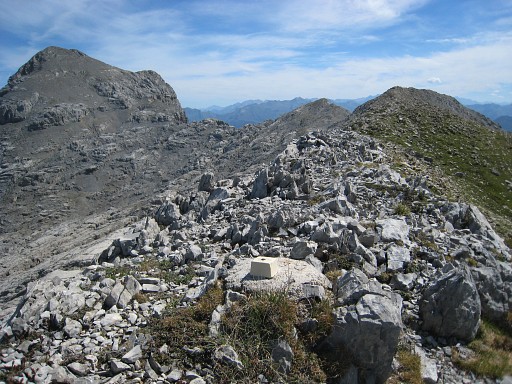
 An overall view of the rest of this variant. |
||||||||||||||||||||||||||||||||||||||||||||||||||||||||||||||||||||||||||||
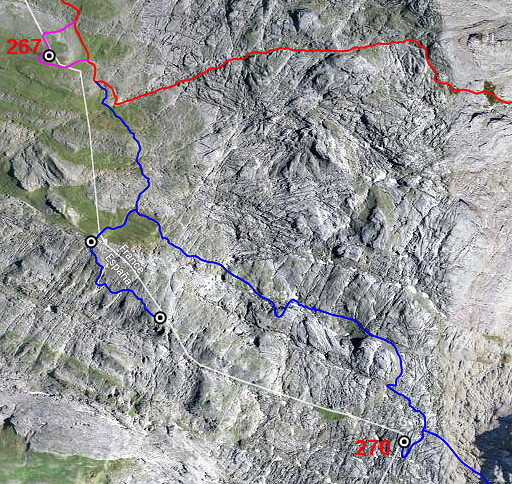
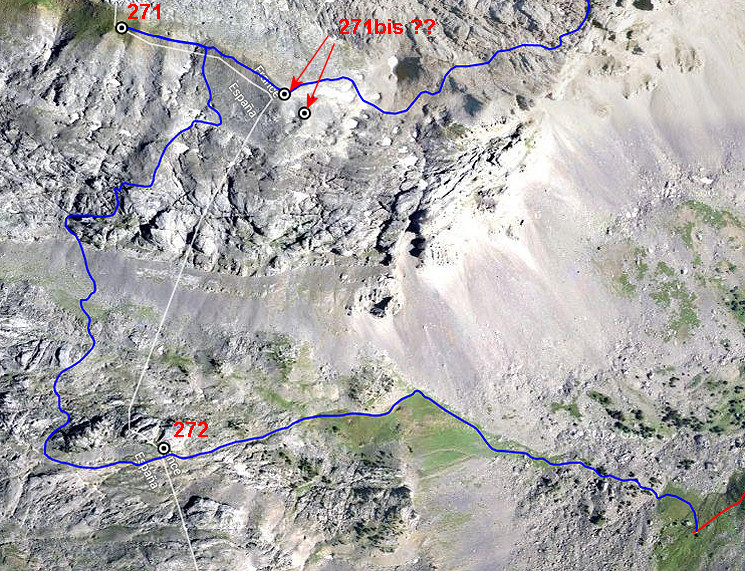
 This map shows the route (in red) from bm271 to 272. |
||||||||||||||||||||||||||||||||||||||||||||||||||||||||||||||||||||||||||||
 |
This picture: from the saddle between both hilltops, looking S. There are no cairns but the direction down is obvious (S) and |
|||||||||||||||||||||||||||||||||||||||||||||||||||||||||||||||||||||||||||
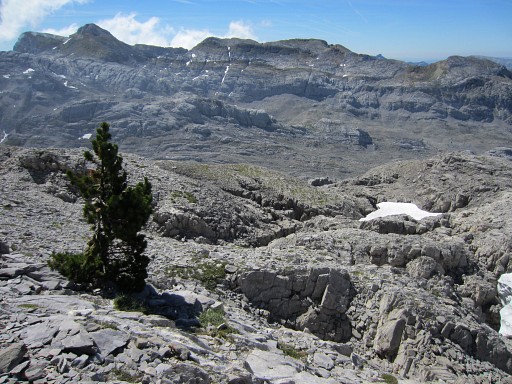 |
there’s a solitary tree as a landmark to descend to. | |||||||||||||||||||||||||||||||||||||||||||||||||||||||||||||||||||||||||||
 |
From there the cairns of a trail become visible and the red line shows approximately the trail from here. | |||||||||||||||||||||||||||||||||||||||||||||||||||||||||||||||||||||||||||
 |
The descent is easier than you might think and takes ± 1h.
|
|||||||||||||||||||||||||||||||||||||||||||||||||||||||||||||||||||||||||||
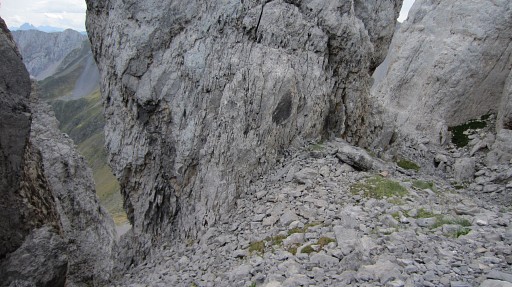
 |
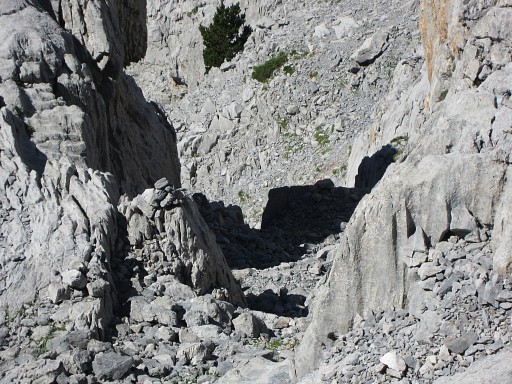
You have to be careful in some places because of the loose grail but by
using your hands and walking stick, it's quite safe. There's one steeper passage: this gully with a breach in the middle. |
|||||||||||||||||||||||||||||||||||||||||||||||||||||||||||||||||||||||||||
 |
Getting closer to the breach. The narrow breach is no problem (but you shouldn’t be too fat and large backpacks have to be passed separately). I suggest to call this breach "la brèche d'Eef", a modest but everlasting testimony of my dwellings through the Pyrenees :-) |
|||||||||||||||||||||||||||||||||||||||||||||||||||||||||||||||||||||||||||
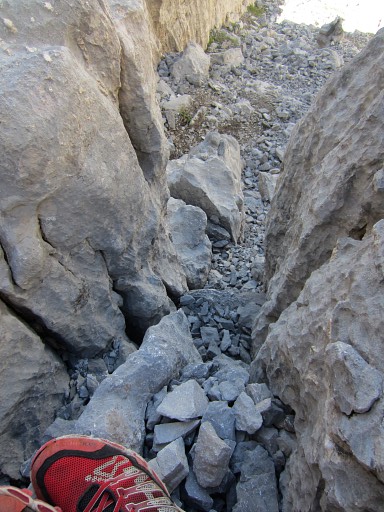 |
From the breach, looking down. There are natural 'steps' to help you down this breach. |
|||||||||||||||||||||||||||||||||||||||||||||||||||||||||||||||||||||||||||
 |
And the rest is quite straightforward and well cairned. |
|||||||||||||||||||||||||||||||||||||||||||||||||||||||||||||||||||||||||||
 |
You will arrive at this signpost. Now pick up the Belagua/Linza direction (=S) The red/white-trail is hardly a trail, the waymarks just lead you through the rough and sharp karst-rocks. From this signpost to bm272 will take you ± 20 minutes. |
|||||||||||||||||||||||||||||||||||||||||||||||||||||||||||||||||||||||||||
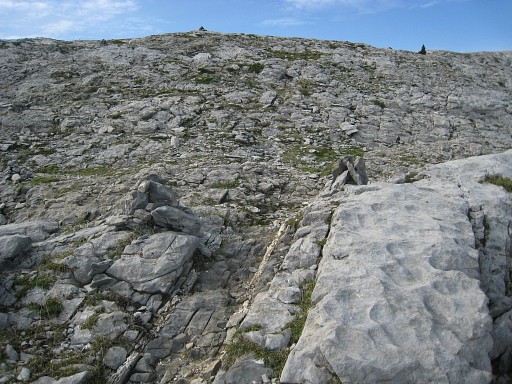
 |
Through rough karst terrain as you can see. |
|||||||||||||||||||||||||||||||||||||||||||||||||||||||||||||||||||||||||||
 |
After ± 300m, you'll arrive here (looking E). Leave the red/white trail and go left (=E) and follow some cairns until bm272 (± 250m). |
|||||||||||||||||||||||||||||||||||||||||||||||||||||||||||||||||||||||||||
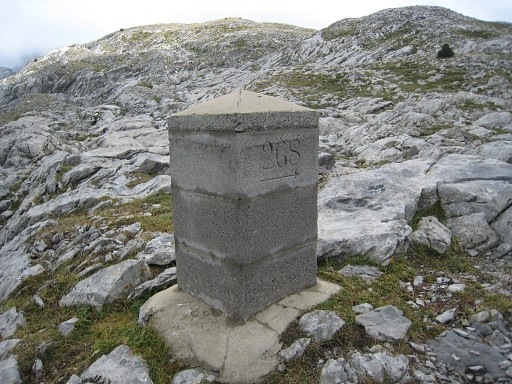
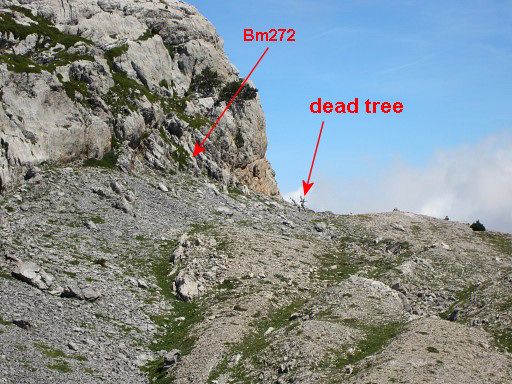 |
Bm272 is close to a dead tree. |
|||||||||||||||||||||||||||||||||||||||||||||||||||||||||||||||||||||||||||
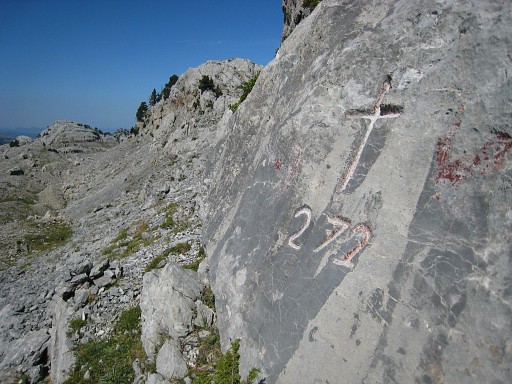 |
Bm272 |
|||||||||||||||||||||||||||||||||||||||||||||||||||||||||||||||||||||||||||
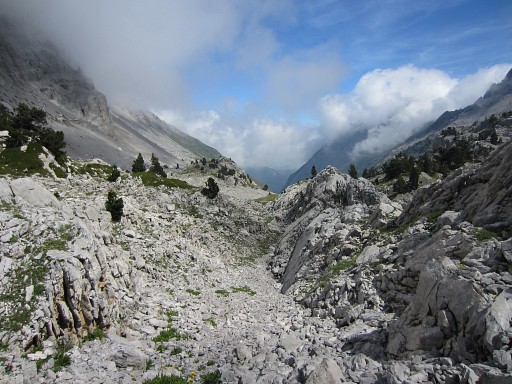 |
Then continue E and descend to the valley. | |||||||||||||||||||||||||||||||||||||||||||||||||||||||||||||||||||||||||||
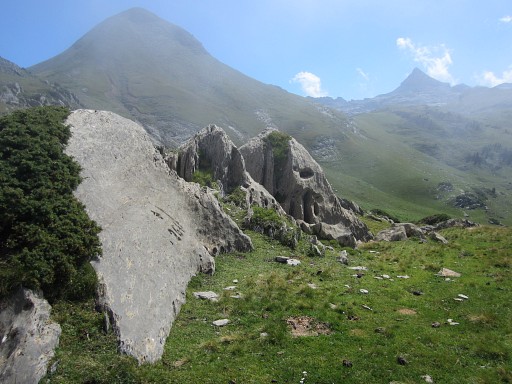
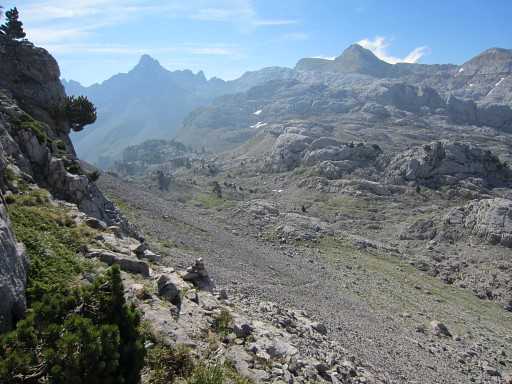
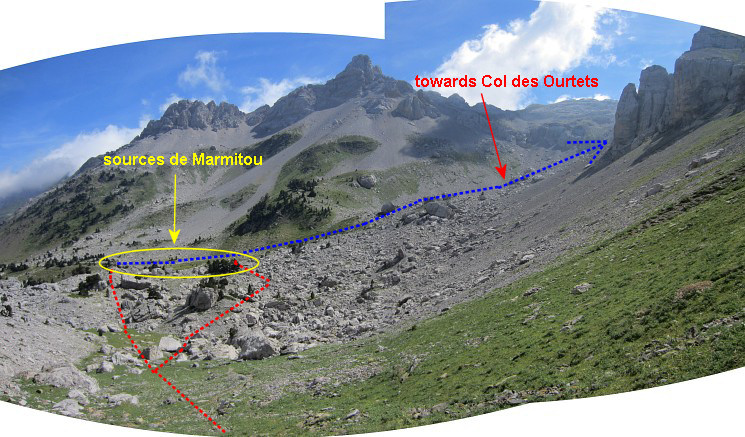 When reaching the rocky area which you have to traverse to get to the Sources de Marmitou, you have two cairn-waymarked routes to choose from. Take the left one, that one is shorter. The Sources de Marmitou offer fresh water and bivouac-opportunities. From the Sources, you can climb to Col des Ourtets and continue to the Table and Pic des Trois Rois. But that's the next stage. |
||||||||||||||||||||||||||||||||||||||||||||||||||||||||||||||||||||||||||||